Node-side Load Balancing
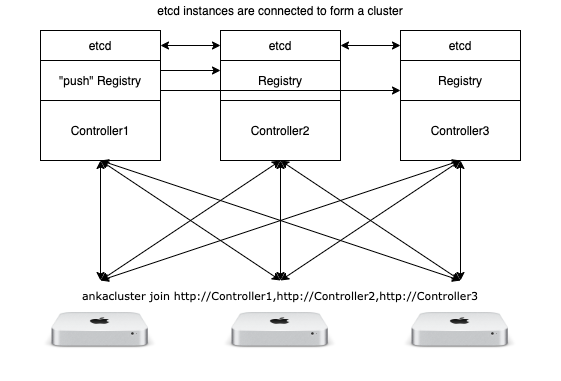
When a load balancer is not available, you can use agent/node-side load balancing by joining with multiple controller URLs. However, your cloud components need to be setup in a certain way or else VM Templates and VM instances will not be shared/seen.

The diagram above shows each controller/registry/etc component together within a single machine. While you can run an etcd cluster on its own, the guide will describe configuration with united components using Docker and Docker-Compose.
1. Configure your ETCD Cluster
Configure all your etcd to communicate with the following configuration (changing IPs of course):
10.0.1.4 is my first etcd instance’s IP; change this to match your networking
  etcd:
    build:
      context: .
      dockerfile: etcd.docker
    ports:
      - "2379:2379"
      - "2380:2380"
    volumes:
      - /var/etcd-data:/etcd-data
    restart: always
    command: /usr/bin/etcd --data-dir /etcd-data
                --listen-client-urls http://0.0.0.0:2379
                --advertise-client-urls http://10.0.1.4:2379
                --listen-peer-urls http://0.0.0.0:2380
                --initial-advertise-peer-urls http://10.0.1.4:2380
                --initial-cluster etcd-1=http://10.0.1.4:2380,etcd-2=http://10.0.1.5:2380,etcd-3=http://10.0.1.6:2380
                --initial-cluster-token my-etcd-token
                --initial-cluster-state new
                --auto-compaction-retention 1
                --name etcd-1
You’ll need to setup your controller with the proper endpoints before this will work.
3. Configure your Controller
Next steps are to:
- Point the controllers to each ETCD endpoint.
I use
etcd:2379as the first etcd instance container is in the same host as this controller and doesn’t need to go through the IP. You can do the same, but be sure to change it to the proper IP on subsequent servers. - Set the
ANKA_PUSH_REGISTRYto the primary registry address and registry port. All three controllers need to use the same address.
  anka-controller:
    build:
       context: .
       dockerfile: anka-controller.docker
    ports:
       - "80:80"
    depends_on:
       - etcd
       - anka-registry
    restart: always
    environment:
      ANKA_REGISTRY_ADDR: http://10.0.1.4:8089
      ANKA_LOCAL_ANKA_REGISTRY: http://10.0.1.4:8089
      ANKA_ETCD_ENDPOINTS: "http://etcd:2379,http://10.0.1.5:2379,http://10.0.1.6:2379"
      ANKA_PUSH_REGISTRY: http://10.0.1.4:8089
You need to choose one of the servers to be your primary push registry. This server will receive all uploaded VM templates and tags, then sync them to the others (see below).
3. Configure your Registry
There are multiple options available for you when considering how to store and share VM Templates and Tags between your registries. Typically, customers setup a network volume that is then mounted onto all registries. However, this is not always available and can sometimes impact performance (push and pull speed).
All registry containers should mount their
/mnt/vol(the default template/tag location) into the host.
We recommend using cron and rsync:
- First, enable SSH access and setup keys to allow password-less access between the servers.
- Setup a crontab from the
ANKA_PUSH_REGISTRYserver to sync the VM templates and tags every few hours:
1 */3 * * * rsync -avz --delete /opt/registry-storage 10.0.1.5:/opt/registry-storage
1 */6 * * * rsync -avz --delete /opt/registry-storage 10.0.1.6:/opt/registry-storage
Alternative, you can setup a background process using inotifywait:
while inotifywait -r /opt/registry-storage; do rsync -avzP --delete --exclude '*ank.upload' /opt/registry-storage/* 10.0.1.4:/opt/registry-storage/ && rsync -avzP --delete --exclude '*ank.upload' /opt/registry-storage/* 10.0.1.5:/opt/registry-storage/; done
4. Start and Verify
You can now docker-compose up -d; docker logs {controller_container_name} on each server and confirm there are no major or persistent errors.
It’s also possible all etcd containers will be running and yet not connect properly. There is a strange timing issue and you’ll simply need to try starting the containers again at as close to the same time as possible.
Next, docker exec -it {etc_container_name} bash and verify the cluster is functional
docker exec -it {etc_container_name} /bin/sh -c "etcdctl endpoint status -w table; etcdctl member list"
+----------------+------------------+---------+---------+-----------+------------+-----------+------------+--------------------+--------+
|    ENDPOINT    |        ID        | VERSION | DB SIZE | IS LEADER | IS LEARNER | RAFT TERM | RAFT INDEX | RAFT APPLIED INDEX | ERRORS |
+----------------+------------------+---------+---------+-----------+------------+-----------+------------+--------------------+--------+
| 127.0.0.1:2379 | d2035ac129f3722a |   3.4.1 |  3.8 MB |     false |      false |       206 |      57633 |              57633 |        |
+----------------+------------------+---------+---------+-----------+------------+-----------+------------+--------------------+--------+
18591719d9b567c5, started, etcd-3, http://10.0.1.6:2380, http://10.0.1.6:2379, false
c7d20e52a7031fa7, started, etcd-2, http://10.0.1.5:2380, http://10.0.1.5:2379, false
d2035ac129f3722a, started, etcd-1, http://10.0.1.4:2380, http://10.0.1.4:2379, false
If you don’t see all three etcd instances in the results, there is a problem.
The last thing to check is the controller health:
❯ curl http://10.0.1.4/api/v1/status
{"status":"OK","message":"","body":{"status":"Running","version":"1.11.0-59d63cca","registry_address":"http://10.0.1.4:8089","registry_status":"Running","license":"basic"}}
❯ curl http://10.0.1.5/api/v1/status
{"status":"OK","message":"","body":{"status":"Running","version":"1.11.0-59d63cca","registry_address":"http://10.0.1.5:8089","registry_status":"Running","license":"basic"}}
❯ curl http://10.0.1.6/api/v1/status
{"status":"OK","message":"","body":{"status":"Running","version":"1.11.0-59d63cca","registry_address":"http://10.0.1.6:8089","registry_status":"Running","license":"basic"}}
4. Join the controllers to your Node
❯ sudo ankacluster join http://10.0.1.4,http://10.0.1.5,http://10.0.1.6

Password:
Testing  http://10.0.1.4
Testing connection to the controller...: Ok
Testing connection to the registry...: Ok
Success!
Testing  http://10.0.1.5
Testing connection to the controller...: Ok
Testing connection to the registry...: Ok
Success!
Testing  http://10.0.1.6
Testing connection to the controller...: Ok
Testing connection to the registry...: Ok
Success!
Anka Cloud Cluster join success